Configuring Unattended Operations and Cache Settings
This documentation references PopMedNet 2021.1 +
PopMedNet User's Guide
Based on version 2021.1 +
Unattended Operations Settings
The unattended operations settings allow the DataMart Client (DMC) to operate in a fully manual or fully automated request processing.
Unattended operation settings at the DataMart Client interact with access controls on the Portal. DataMart access controls on the Portal permit automatic querying based on the request type, the project that the request is submitted within, and who submits the request. Contact your PopMedNet Network or Project Administrator regarding the specific settings for your DataMart. Only requests that are approved to be run automatically will be affected by unattended operations settings; other requests must be responded to manually.
To select unattended operations, click on the Settings button on the DataMart Client. Then select your Network from the list and click Edit. In the next window, double-click your DataMart Name (or select the name and click Edit) to be brought to the window containing the unattended operations. If you select 'Allow unattended operation', the DataMart Client will check for new requests and process them according to the options you select:
1) Notify me of new queries, but do not process them automatically
2) Process new queries automatically, but do not upload results (requires DMC version 6.9 or higher)
3) Process new queries automatically and upload results
Unattended operations can only occur if the DataMart Client is open or minimized. Minimize the DataMart Client by clicking the Close button along the bottom of the DataMart Client when on the request list screen. When the application is minimized, an icon appears in your computer's System Tray.

Figure 1.
The table below details the unattended operation settings:
| Option | Description |
|---|---|
| Notify me of new queries, but do not process them automatically | The DataMart Client checks for queries and notifies you via a pop-up notification in the System Tray above the DataMart Client icon. |
| Process new queries automatically, but do not upload results | The DataMart Client checks for queries, processes them automatically, and then saves the results in your local drive. Upon open the processed queries, the results will be present and available for export, reject, and/or upload. In order to save the results, you will need enable response caching as described below. |
| Process new queries automatically and upload results | The DataMart Client checks for queries, processes them automatically, and uploads the results. This option does not require your intervention in the process. If you have set a low cell count limit, this option will automatically zero cell counts according to that limit before upload. |
Cache Settings (requires DMC version 6.9 or higher)
The cache settings gives the user the ability to retain results in the DataMart Client (DMC) after closing the request window. When this functionality is enabled, the DataMart Client will locally save MDQ results that were either run manually or automatically through an unattended operation. The DataMart Client will also save any files that were attached to a request, even ones that have yet to be uploaded. All results and files that are saved to un-uploaded requests will not leave the user's local environment and will not be visible on the Query Tool (web portal). The files are stored in the following location: C:\Users\USERNAME\AppData\Roaming\PopMedNet\PMN\cache
Upon opening a request containing a cached result, the user can do all request relevant actions (run, reject, export, upload, etc.), except suppress a low cell count in a MDQ. In order to suppress low cell counts, the user must re-run the query THEN suppress the low cells. The newly "suppressed" result can then be uploaded or saved for a future upload.
To set-up your response caching settings, click on the Settings button on the DataMart Client. Then select your Network from the list and click Edit. In the next window, double-click your DataMart Name (or select the name and click Edit) to be brought to the window containing the cache settings.
The table below details the response cache settings:
| Option | Description |
|---|---|
| Enable Response Caching | By checking the box beside Enable Response Caching, the user is turning on this feature. An un-checked box indicates the user is turned-off. Response caching must be enabled in order to user the unattended operation to "Process new queries automatically, but do not upload results." |
| Days to retain responses | If response caching is turned on, then the user can select the duration which the DataMart Client will retain the results. Examples of retention rates:
|
| Encrypt cached items | By checking the box beside Encrypt cached items, the DataMart Client will encrypt the locally saved files. |
| Enable explicit cache removal | By checking the box beside Enable explicit cache removal, the user will be given the ability to clear the cache for a single request. When a user opens a request, they will notice a new button alongside the other options to Clear Cache for this particular request (Figure 3). All other requests will be unaffected. |
| Clear Cache | If interested in erasing all saved results for a DataMart, the user can select the Clear Cache button in the DataMart Settings (Figure 2) |
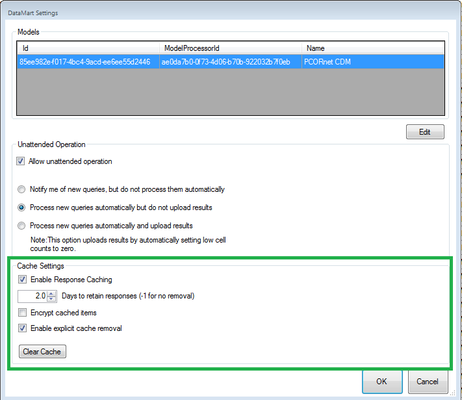
Figure 2.
![]()
Figure 3.