Configuring your DataMarts v5.0
This documentation references PopMedNet 5.0 +
For version 4.0.3 documentation, please see PopMedNet User's Guide Version 4.0.3
PopMedNet User's Guide
Based on version 5.0
Configuring your DataMarts
You must configure the settings for each DataMart that you have been granted permission to administer. For each DataMart you administer, perform the following steps:
- Navigate to your DataMart: click Settings and select your network in the list and click edit.
- Double click the DataMart name in the list of DataMarts or select it and press Edit to display the DataMart Settings dialog.
- A list of Models represent the various request model processors that are used to process queries issued to your DataMart. For each item in the list, double click it or select it and press Edit. Each Model processor may have different properties that need to be configured. The following sections describe these settings.
- Once each Model Processor is configured, exit and restart the DataMart Client before executing any requests.
- Proceed to Configuring your DataMart Unattended Operations.

Summary Table Query Model Processor Settings
For the Summary Table Query model processors (Summary: Prevalence Queries, Summary: Incidence Queries, and Summary: Most Frequently Used Queries), select your ODBC Connection or connect to your SQL Server database and, optionally, set a low cell count limit.
Use the Data Provider dropdown menu to specify whether you are connecting to your database via an ODBC connection or a connection to SQL Server.
ODBC
Under "DataMart ODBC DSN", select the data source name. This is the database that will be queried when you run Summary Table queries from this DataMart. Additional DataMarts can be created to direct queries to other data sources.
If you do not have an ODBC data source established, see Creating an ODBC Connection for instructions.
SQL Server
Enter the connection string information for your SQL Server database. Enter the server and port information, your user ID and password for the database, and the name of the database.
Low Cell Counts
The low cell count setting allows you to specify a cell count limit for results. This setting scans the query results for any individual cell that is less than the specified limit and highlights that row in yellow. You can then choose to upload the results without changing the low cells or click Post Process to change the relevant cells to zero before uploading.
If you select “Process new queries automatically and upload results” in the Unattended Operation settings, the DataMart Client will automatically set the low cell count data to 0 based on the low cell count setting.
Click OK to complete the configuration for this model processor.


ESP Requests and SQL Distribution Model Processors
For the ESP Requests and SQL Distribution model processors, enter your connection string information for your ESP database in the pgAdmin application.
Enter the server and port information, your username and password for the database, and the name of the database (note that the username, password, and database fields are case-sensitive). Contact your local Database Administrator for guidance on entering these settings.
Click Test to check your connection to the database.
The ESP Requests and SQL Distribution model processors contain default connection and command timeout values, set in seconds. You may need to adjust these values depending on the speed of your machine and/or the size of your data source.

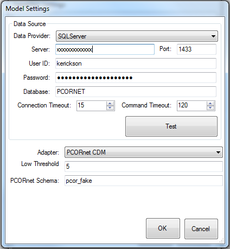
PCORnet CDM Settings
Please consult your local Database Administrator when entering these settings. All connection settings must be entered exactly as they exist in your database instance, including capitalization.
- Data Provider: This is the Relational Database Management System (RDBMS) platform you are attempting to connect to. It is responsible for informing the system which SQL flavor to translate queries to.
- Server: This is the location of the server that your RDBMS resides on. It may be “localhost”, an IP address, or other depending on your local IT setup.
- Port: This is the port that your RDBMS uses to connect to a querying interface like the DataMart Client.
- User ID: The RDBMS user account that has the ability to run queries against your specified database.
- Password: The password associated with the above account.
- Database: The name of your PCORnet CDM RDBMS database.
- Connection Timeout: The amount of time (in seconds) the DataMart Client will attempt to connect to the database before ending the process.
- Command Timeout: The amount of time (in seconds) the DataMart Client will allow a query to execute against the database before ending the process.
- Adapter: Select "PCORnet CDM". This field informs the DataMart Client what supported data model your data adhere to. If PCORnet CDM is not selected, queries will fail upon execution.
- Low Threshold: Specifies the limit for zeroing query results. If a patient count for any row is lower than the number entered here, the DataMart Administrator will have the option to set those counts to 0 before uploading the results.
- PCORnet Schema: Specifies the appropriate schema in your database to direct queries to.